Blog

  • How Do You Choose the Right Nail Clippers for Your Cat?

    How Do You Choose the Right Nail Clippers for Your Cat?

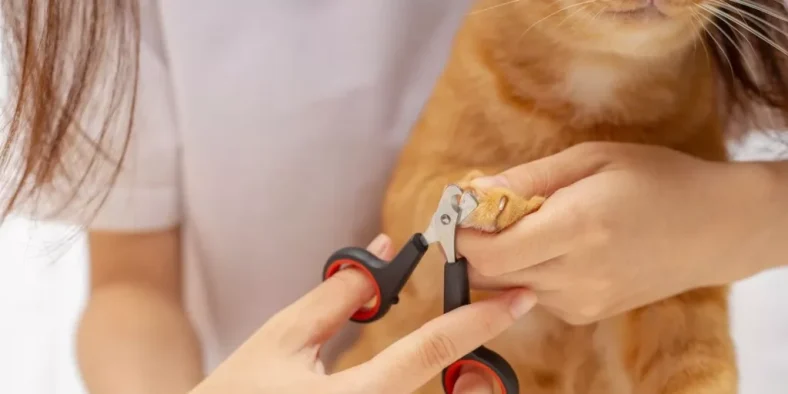
    When it comes to selecting the perfect nail clippers for your cat, understanding your feline’s specific needs is paramount. From considering their size to the type of blade material and safety features, each aspect plays a crucial role in ensuring a successful nail trimming session. But what about the lesser-known factors that could make a significant difference in your cat’s grooming routine? Let’s explore some surprising elements that could help you make the best choice for your beloved pet.

    Consider Your Cat’s Size

    When selecting nail clippers for your cat, consider the size of your feline friend. Larger cats may require stronger clippers with bigger openings to accommodate their thicker nails. Smaller cats, on the other hand, might find larger clippers cumbersome and difficult to handle. It’s crucial to choose clippers that match the size of your cat to ensure a safe and effective trimming experience.

    For larger cats, opt for clippers with sturdy construction and wider openings to prevent any discomfort or accidents during nail trimming sessions. These clippers provide the necessary strength to cut through thicker nails without causing any splintering or breakage.

    On the contrary, smaller cats will benefit from compact clippers that are easier to maneuver and control, ensuring precise cuts without any accidental nicks.

    Evaluate the Blade Material

    To ensure efficient nail clipping for your cat, carefully assess the blade material of the clippers. The blade material plays a crucial role in how effective and durable the clippers will be.

    Opt for stainless steel blades as they’re sharp, durable, and resistant to rust. Stainless steel blades maintain their sharpness for longer periods, ensuring a clean and precise cut every time you trim your cat’s nails. Additionally, stainless steel is easy to clean and sanitize, reducing the risk of infections.

    Avoid clippers with blades made of inferior materials that may dull quickly or cause splintering of the nails, leading to discomfort for your cat. By choosing clippers with high-quality stainless steel blades, you can make the nail clipping process smoother and more comfortable for both you and your feline friend.

    Look for Safety Features

    Ensure the nail clippers you choose for your cat have essential safety features to prevent accidents during nail trimming. Look for nail clippers with a safety guard or quick-stop feature to avoid cutting the quick, the sensitive part of the nail that contains blood vessels and nerves. This guard helps prevent over-trimming, which can cause pain and bleeding.

    Additionally, opt for clippers with a non-slip grip to ensure a steady hold during nail trimming, reducing the risk of accidental slips that could harm your cat. Some nail clippers also come with a locking mechanism to keep them closed when not in use, preventing accidental cuts or injuries.

    Prioritize safety features such as these to make the nail trimming process as safe and stress-free as possible for both you and your feline friend. Remember, safety should always be a top priority when choosing nail clippers for your cat.

    Choose Between Manual and Electric

    Consider the advantages and limitations of both manual and electric nail clippers for your cat before making a decision.

    Manual nail clippers are straightforward to use, allowing you to have full control over the clipping process. They’re generally quieter, which can be less intimidating for your cat. However, manual clippers require more effort and precision from you, which may be challenging if your cat is fidgety or if you have limited hand strength.

    On the other hand, electric nail clippers are powered, making the clipping process quicker and potentially less stressful for both you and your cat. They often come with safety features like sensors to prevent overcutting, reducing the risk of injury. However, electric clippers can be noisier, which might startle your cat, and they tend to be more expensive upfront. Additionally, some cats may find the vibration of electric clippers uncomfortable.

    Ultimately, your choice between manual and electric nail clippers will depend on your cat’s temperament, your comfort level with the tool, and your budget.

    Seek Recommendations and Reviews

    Explore online forums and pet product review websites to gather valuable insights and feedback on recommended nail clippers for your cat. These platforms provide a wealth of information from fellow cat owners who’ve firsthand experience with different types of nail clippers. Look for reviews that mention ease of use, durability, safety features, and effectiveness in trimming cat nails. Pay attention to any recurring positive or negative comments to help you make an informed decision.

    When seeking recommendations, consider joining online cat care communities or forums where members are often willing to share their opinions and offer advice. Additionally, reputable pet product review websites can provide detailed comparisons and rankings of various nail clippers based on performance and user satisfaction.

    Pet supplies

    [product_category category=”pet-supplies” per_page=”10″ columns=”2″ orderby=”date” order=”rnde”]

  • Organizing Your Campsite Like a Pro

    Organizing Your Campsite Like a Pro

    When it comes to organizing your campsite like a pro, efficiency is key. Imagine arriving at your campsite and effortlessly knowing where everything is, having a well-thought-out setup that maximizes space and minimizes clutter. From smart gear organization to clever storage solutions, there are strategies that can elevate your camping experience to the next level. So, how can you transform your campsite into a well-oiled machine of functionality and convenience?

    Essential Gear Organization

    When setting up your campsite efficiently, prioritize organizing your essential gear for easy access and convenience. Begin by grouping similar items together in clear, labeled containers or bags. Store frequently used gear like flashlights, first aid kits, and cooking supplies in easily reachable locations. Hang essentials such as keys, multitools, and headlamps on a designated hook or carabiner near the entrance of your tent for quick access.

    Utilize storage solutions like stackable bins or collapsible shelves to maximize space within your tent or camping area. Keep your sleeping gear, like sleeping bags and pads, neatly rolled or folded to save space and maintain organization. Consider using gear lofts or hanging organizers inside your tent to store items off the ground and create more floor space for movement.

    Prioritizing essential gear organization not only saves time but also ensures you have everything you need at your fingertips. By implementing these strategies, you can streamline your campsite setup and enjoy a more comfortable and stress-free outdoor experience.

    Space Maximization Techniques

    To make the most of your camping space, strategically arrange your gear and equipment to optimize every inch available. Utilize vertical space by hanging items like lanterns, utensils, and bags on hooks or tree branches. Consider collapsible furniture that can be easily stored when not in use, such as foldable chairs and tables.

    Use storage bins to keep smaller items organized and compactly stacked. Utilize the space under your camping table for additional storage by hanging storage pouches or attaching hooks for hanging items. Maximize space inside your tent by using hanging organizers or gear lofts to keep essentials off the floor.

    Opt for multipurpose items like a cooler that can double as a side table. When packing your vehicle, place heavier items at the bottom and lighter items on top to prevent crushing and make the most of the space available. By employing these space maximization techniques, you can ensure a well-organized and efficient campsite setup.

    Kitchen Setup and Storage Ideas

    For an efficient campsite kitchen setup, consider utilizing compact storage solutions and organizing tools to streamline meal preparation and cleanup. Opt for collapsible silicone containers or nesting cookware sets to save space when packing.

    Hanging storage shelves or organizers can help keep cooking utensils, spices, and cleaning supplies easily accessible. Utilize clear plastic bins or labeled bags to separate food items and kitchen essentials, making it easier to find what you need.

    A portable kitchen station with multiple compartments can serve as a designated cooking area, keeping everything in one place. To save time and effort, pack a compact dishwashing tub, biodegradable soap, and quick-dry towels for easy cleanup.

    Additionally, using a foldable table or countertop can provide extra workspace for meal prep. By incorporating these kitchen setup and storage ideas, you can create a functional and organized campsite kitchen that enhances your outdoor cooking experience.

    Tips for Maintaining Order

    Maintaining order at your campsite requires consistent organization and regular tidying to ensure a smooth and enjoyable outdoor experience. Start by designating specific areas for different activities like cooking, sleeping, and relaxation. Keep your cooking supplies together in one area, preferably near the fire or stove, to streamline meal preparation. After each use, promptly clean and store utensils to prevent clutter from accumulating.

    Utilize storage containers or bins to keep small items like spices, utensils, and matches organized and easily accessible. Labeling these containers can further aid in maintaining order and finding things quickly. Make it a habit to tidy up throughout the day, putting items back in their designated spots after use. This simple practice will prevent chaos from taking over your campsite.

    Regularly check for any garbage or debris around your campsite and dispose of it properly to maintain a clean and organized environment. By staying on top of tidying and organizing, you can enjoy a stress-free camping experience surrounded by nature’s beauty.

    Camping

    [product_category category=”camping” per_page=”10″ columns=”2″ orderby=”date” order=”rnde”]

  • What Are Genius Hacks for Faster Meal Preparation?

    What Are Genius Hacks for Faster Meal Preparation?

    When it comes to speeding up your meal prep game, there are some genius hacks that can make all the difference. From mastering the art of pantry organization to discovering quick cooking techniques, there are simple yet effective ways to cut down your time in the kitchen. By incorporating these smart strategies, you’ll find yourself whipping up delicious meals in no time. But there’s one more key hack that can truly revolutionize your meal preparation routine – eager to uncover it?

    Meal Prep Organization

    Get ahead of your meal prep game by streamlining your kitchen space with these genius organization tips. Start by decluttering your pantry and cabinets. Toss expired items and donate what you won’t use. Use clear containers for grains, pasta, and snacks to easily see what you have. Arrange your spices alphabetically or by cuisine to quickly find what you need while cooking.

    Invest in stackable storage containers to store prepped ingredients neatly in the fridge. Label each container with the contents and date prepared for easy rotation. Keep a designated area for meal prep tools like cutting boards, knives, and measuring cups to have everything at arm’s reach. Hang cooking utensils on hooks or a magnetic strip to free up drawer space.

    Utilize drawer dividers to separate gadgets and tools efficiently. Keep frequently used items in the front for easy access. Maximize vertical space by installing shelves or racks to store small appliances or cookware. By implementing these organization hacks, you’ll cut down on meal prep time and enjoy a more efficient cooking experience.

    Quick Cooking Techniques

    To speed up your meal preparation process, employ quick cooking techniques that will save you time in the kitchen. One of the most effective methods is stir-frying. This high-heat cooking technique allows you to quickly cook vegetables, meats, and sauces in a single pan, reducing overall cooking time.

    Another useful technique is blanching, which involves briefly boiling vegetables before plunging them into ice water to stop the cooking process. Blanching helps to retain the vibrant color and nutrients of the vegetables while reducing their cooking time.

    Additionally, consider using a pressure cooker for dishes that typically require long cooking times, such as stews and braised meats. Pressure cookers significantly shorten cooking times by using steam and pressure to cook food quickly.

    Another quick cooking technique is steaming, which is perfect for vegetables, fish, and dumplings. Steaming preserves the nutrients in food and cooks them rapidly without the need for added fats.

    Time-Saving Kitchen Tools

    Consider investing in efficient kitchen gadgets to streamline your meal preparation process and save valuable time. Time-saving tools can make a significant difference in how quickly you can put together a meal.

    A multi-functional food processor can chop, slice, and dice ingredients in seconds, cutting down on prep time significantly. An electric pressure cooker is another valuable tool that can cook meals up to 70% faster than traditional methods. It’s perfect for busy days when you want a home-cooked meal without spending hours in the kitchen.

    A high-quality chef’s knife can also make a big impact, allowing you to quickly and precisely cut through ingredients. Additionally, a set of measuring cups and spoons can help you accurately portion out ingredients without the need for multiple tools. Lastly, consider investing in a kitchen scale for precise measurements, especially when baking.

    These tools are essential for any efficient kitchen and can help you save time and effort while preparing delicious meals.

    Smart Ingredient Substitutions

    Maximize your culinary creativity by exploring smart ingredient substitutions to enhance your dishes while adapting to dietary restrictions or ingredient availability. When you find yourself short on a particular ingredient, don’t fret! Try using applesauce as a replacement for oil or butter in baking recipes to reduce the fat content while keeping your treats moist.

    For savory dishes, consider swapping out breadcrumbs with crushed nuts like almonds or pecans for a flavorful and crunchy coating. If you’re out of buttermilk, simply mix regular milk with lemon juice or vinegar as a quick alternative.

    For a dairy-free option, coconut milk can work wonders in creamy sauces or soups instead of heavy cream. When a recipe calls for white sugar, experiment with natural sweeteners like honey, maple syrup, or agave nectar for a healthier twist. Additionally, mashed bananas can serve as a substitute for eggs in certain baked goods, adding moisture and natural sweetness.

    Kitchen Appliances

    [product_category category=”kitchen-appliances” per_page=”10″ columns=”2″ orderby=”date” order=”rnde”]

  • What Are the Best DIY Ideas for Halloween Home Decor?

    What Are the Best DIY Ideas for Halloween Home Decor?

    When it comes to setting the stage for a truly spooktacular Halloween, the devil is in the details when it comes to DIY home decor. From sinister centerpieces to eerie outdoor displays, there’s a plethora of creative ideas to take your haunted ambiance to the next level. Imagine the thrill of crafting your own haunted house centerpiece or conjuring a ghostly gallery on your walls. So, how can you turn your home into a Halloween haven that will make your guests shriek with delight?

    Spooky Centerpiece Ideas

    Get your Halloween party table looking hauntingly festive with these eerie centerpiece ideas.

    One spooky option is to create a witch’s cauldron centerpiece. Take a large black cauldron and fill it with dry ice for a foggy effect. Place a plastic witch figurine next to it for an extra eerie touch.

    Another idea is to make a haunted house centerpiece. Use a small cardboard house, paint it black, and add spooky details like spider webs and miniature ghosts. Place a flickering LED candle inside to mimic a haunted house at night.

    For a more elegant look, consider a black rose bouquet centerpiece. Spray paint artificial roses black and arrange them in a vase with black feathers for a sophisticated yet spooky touch.

    Lastly, a creepy crawly centerpiece can add a touch of horror to your table. Fill a glass bowl with fake spiders and cobwebs, and place a few plastic insects crawling out for a truly terrifying effect.

    These centerpiece ideas are sure to impress your Halloween party guests.

    Haunted Wall Decorations

    For a spine-chilling ambiance, consider adorning your walls with eerie haunted decorations this Halloween. Create a ghostly gallery by hanging portraits of creepy characters with glowing eyes or moving parts.

    Utilize flickering LED candles to cast eerie shadows, adding depth to your haunted wall decor. Incorporate fake spider webs, strategically placing plastic spiders within them to give the illusion of a haunted infestation crawling up your walls.

    To enhance the spooky atmosphere, add a DIY haunted mirror by distressing an old frame and painting eerie messages or handprints on the glass. For a more interactive experience, craft a floating ghost using white fabric draped over a wire frame, giving the illusion of a specter hovering against your wall.

    Finish off your haunted wall decorations with sinister silhouettes of bats or witches flying across the moonlit night, creating a frightful scene that will leave your guests spellbound this Halloween.

    Creepy Outdoor Displays

    When transforming your outdoor space for Halloween, focus on creating creepy displays that will send shivers down the spines of passersby. One idea is to set up a haunted graveyard in your front yard. Use old tombstones made from foam or cardboard, add eerie lighting, and scatter fake bones or body parts around for an extra chilling effect.

    Another spooky display option is to create a scene of witches brewing a potion. Set up a cauldron with dry ice for a smoking effect, place broomsticks nearby, and add a creepy soundtrack to enhance the ambiance.

    For a simpler yet equally creepy touch, hang ghostly figures from tree branches or porch ceilings. You can make these yourself using white sheets or purchase ready-made ones from Halloween stores.

    Remember to utilize sound effects like cackling witches, howling wolves, or rattling chains to maximize the scare factor. These DIY outdoor displays are sure to make your home the talk of the neighborhood this Halloween.

    Eerie Lighting Effects

    Illuminate your Halloween decor with eerie lighting effects that will set the perfect spooky atmosphere for your home. Creating a chilling ambiance can be achieved through simple DIY lighting tricks.

    Start by placing flickering LED candles in windows or on mantels to cast ghostly shadows. String orange or purple fairy lights around doorways or trees outside for an enchanting glow.

    Incorporate black lights into your displays to make fluorescent decorations pop and give off an otherworldly feel. Consider using projection mapping to cast eerie images onto your walls, such as dancing skeletons or creeping spiders.

    Utilize strategically placed spotlights to highlight certain areas, like a haunted graveyard or a witch’s cauldron. For a more subtle effect, swap out regular light bulbs with colored ones in shades like red or green.

    With these eerie lighting ideas, your Halloween decorations will be sure to impress and spook all who dare to visit your haunted abode.

    Home décor

    [product_category category=”home-decor” per_page=”10″ columns=”2″ orderby=”date” order=”rnde”]

  • How Supplements Can Protect Your Body

    How Supplements Can Protect Your Body

    You may be familiar with the term antioxidants, but do you truly understand their impact on your body? Discover how these powerful supplements can act as a shield, protecting you from the inside out. From combating oxidative stress to promoting overall wellness, the benefits of antioxidants are vast and essential for maintaining a healthy lifestyle. But how exactly do they work their magic? Let’s delve deeper into the world of antioxidants and unveil the secrets behind their protective prowess.

    The Science Behind Antioxidants

    Understanding how antioxidants work in the body is essential for grasping their protective properties against oxidative stress. Antioxidants are molecules that help neutralize free radicals, which are unstable atoms that can cause damage to cells. When free radicals accumulate, they can lead to oxidative stress, a process linked to various chronic diseases like heart disease and cancer. Antioxidants work by donating electrons to these free radicals, stabilizing them and preventing them from causing harm.

    Vitamins A, C, and E, as well as minerals like selenium and manganese, are examples of antioxidants that play a crucial role in protecting your cells from damage. These antioxidants can be found in a variety of foods like fruits, vegetables, nuts, and seeds. By incorporating a diverse range of antioxidant-rich foods into your diet, you can help your body combat oxidative stress and maintain overall health. Remember, a balanced diet filled with these protective molecules can go a long way in safeguarding your body from the harmful effects of free radicals.

    Benefits of Antioxidant Supplements

    Antioxidant supplements offer a convenient way to boost your intake of essential protective molecules beyond what you can obtain from food alone. These supplements provide a concentrated dose of antioxidants like vitamin C, vitamin E, beta-carotene, and selenium, which are crucial for combating free radicals in your body. By taking antioxidant supplements, you can enhance your body’s defense against oxidative stress, which is linked to various chronic diseases and aging processes.

    One of the key benefits of antioxidant supplements is their ability to strengthen your immune system. Antioxidants help support immune function by neutralizing harmful free radicals that can weaken your immune response. Additionally, these supplements can aid in reducing inflammation in the body, promoting better overall health and potentially lowering the risk of inflammatory conditions.

    Moreover, antioxidant supplements may also contribute to improved skin health. By fighting oxidative damage from the inside, antioxidants can help maintain youthful skin and protect against skin aging caused by environmental factors. Overall, incorporating antioxidant supplements into your daily routine can be a valuable addition to support your body’s natural defense mechanisms.

    How Antioxidants Combat Oxidative Stress

    Curious about how antioxidants actively combat oxidative stress in your body? Oxidative stress occurs when there’s an imbalance between free radicals and antioxidants in your system. Free radicals, which are unstable molecules, can damage cells and contribute to various diseases. Antioxidants play a crucial role in neutralizing these harmful free radicals, thus protecting your cells from damage.

    Antioxidants work by donating an electron to the free radicals, stabilizing them and preventing them from causing further harm. They essentially act as scavengers, searching for and neutralizing free radicals before they can inflict damage on your body. By doing so, antioxidants help reduce the oxidative stress on your cells and tissues.

    Moreover, antioxidants can also help repair the damage caused by oxidative stress, promoting cell health and overall well-being. Including a variety of antioxidant-rich foods in your diet or taking antioxidant supplements can help ensure that your body has an adequate defense against oxidative stress.

    Tips for Choosing Quality Antioxidant Supplements

    To ensure you’re selecting high-quality antioxidant supplements, consider checking for third-party testing certifications. Third-party testing involves independent organizations evaluating supplements to verify their ingredients and quality. Look for certifications from reputable organizations like NSF International, USP, or ConsumerLab.com on the supplement packaging or the manufacturer’s website. These certifications indicate that the product has undergone rigorous testing and meets specific quality standards.

    Another tip for choosing quality antioxidant supplements is to check the form of antioxidants used. Some forms are more bioavailable and effective than others. For example, opt for natural forms like vitamin E (d-alpha-tocopherol) over synthetic forms (dl-alpha-tocopherol) for better absorption and utilization by your body.

    Additionally, consider the dosage and concentration of antioxidants in the supplement. Ensure that the product provides an adequate amount of antioxidants per serving to be effective. Reading reviews from other consumers and consulting with healthcare professionals can also help you make an informed decision when selecting antioxidant supplements.

    Health and fitness

    [product_category category=”health-and-fitness” per_page=”10″ columns=”2″ orderby=”date” order=”rnde”]

  • Babyproofing Your Kitchen: A Complete Checklist

    Babyproofing Your Kitchen: A Complete Checklist

    As you navigate the task of babyproofing your kitchen, ensuring every corner is secure is paramount. From the cabinets to the appliances, there are numerous areas that require careful attention to detail. But what about those often-overlooked spaces that can pose unexpected risks to your little explorer? Stay tuned to uncover some lesser-known babyproofing tips that could make all the difference in creating a truly safe kitchen environment for your child.

    Essential Babyproofing Supplies

    When babyproofing your kitchen, ensure you have all the essential supplies for keeping your little one safe. Start by installing safety latches on cabinets and drawers to prevent your curious explorer from accessing harmful items. These latches are easy to install and provide a simple yet effective way to secure potentially dangerous areas.

    Next, cover all electrical outlets with outlet covers to prevent your child from inserting objects into them. Outlet covers are inexpensive and readily available at most stores selling babyproofing supplies.

    Additionally, consider installing stove knob covers to prevent your child from accidentally turning on the stove. These covers are transparent and easily removable for adult use.

    Lastly, invest in corner guards to cushion sharp edges on countertops and tables. These guards come in various colors and designs to blend seamlessly with your kitchen decor while ensuring your child’s safety.

    Safety Measures for Kitchen Appliances

    To ensure the safety of your little one in the kitchen, always remember to implement proper safety measures when using kitchen appliances.

    Start by keeping appliance cords out of reach to prevent any accidental tugging or entanglement.

    When using appliances like blenders or food processors, make sure they’re placed on stable surfaces to avoid tipping over.

    Always unplug appliances when not in use and store them out of reach to prevent curious hands from turning them on.

    Additionally, when cooking on the stove, use back burners and turn pot handles towards the back to prevent accidental spills or burns.

    Remember to regularly check for any wear and tear on appliances and replace or repair them as needed to avoid potential hazards.

    Childproofing Kitchen Cabinets and Drawers

    Make sure to secure all kitchen cabinets and drawers to prevent your little one from accessing potentially harmful items or substances. Start by installing safety latches or locks on cabinet doors to keep curious hands out of places they shouldn’t be. These locks are typically easy for adults to operate but can effectively deter children from opening cabinets.

    Make it a habit to store all cleaning products, sharp objects, and medications out of reach or in locked cabinets. Consider organizing your cabinets so that non-hazardous items are within your child’s reach, making it safer for them to explore.

    For drawers, use drawer locks to prevent them from being pulled out completely, reducing the risk of pinched fingers or items falling on your child. Regularly check the condition of these safety devices to ensure they’re still working properly.

    Tips for Creating a Baby-Friendly Space

    Creating a baby-friendly space involves strategically arranging furniture and décor to ensure your little one’s safety and comfort. Begin by placing soft rugs or foam mats on the floor to create a cushioned play area. Secure heavy furniture like bookshelves and dressers to the wall to prevent tipping.

    Cover sharp corners of tables and countertops with corner guards to protect your baby from bumps and bruises. Opt for furniture with rounded edges to minimize the risk of injuries. Keep electrical cords out of reach or use cord shorteners to prevent strangulation hazards.

    Install safety gates at the top and bottom of stairs to restrict access. Consider using furniture straps to secure TVs and other large items that could topple over. Keep small objects out of reach to prevent choking hazards.

    Baby products

    [product_category category=”baby-products” per_page=”10″ columns=”2″ orderby=”date” order=”rnde”]

  • Best Practices for Styling Your Hair Without Damaging It

    Best Practices for Styling Your Hair Without Damaging It

    When it comes to styling your hair without causing damage, there’s a delicate balance between achieving the look you desire and maintaining your hair’s health. By incorporating some key practices into your styling routine, you can strike that balance effectively. These practices not only protect your hair from heat damage but also promote its strength and natural beauty. So, are you ready to discover the secrets to styling your hair flawlessly without compromising its health and vitality? Let’s explore the best practices that will revolutionize your hair styling game.

    Heat Protectants and Their Importance

    To prevent damage from heat styling tools, apply a quality heat protectant spray before using any heat on your hair. This simple step creates a barrier between your hair and the high temperatures, reducing the risk of heat-induced harm. When selecting a heat protectant, opt for one that suits your hair type and offers adequate protection. Spritz the product evenly throughout your hair, ensuring complete coverage from roots to ends.

    Before reaching for your blow dryer, flat iron, or curling wand, take a moment to shield your hair with the protectant spray. By doing so, you help minimize the negative impact of heat styling and maintain healthier locks in the long run. Remember, heat protectants work best when applied to clean, damp hair before any heat styling begins. Don’t underestimate the power of this extra layer of defense for your precious strands.

    Prioritizing the use of a heat protectant is a small change that can make a big difference in the health and appearance of your hair. Make it a non-negotiable step in your styling routine to safeguard your hair from the potential harm of heat tools.

    Gentle Hair Brushing Techniques

    For healthier and smoother hair, adopt gentle hair brushing techniques that minimize breakage and damage. Start by using a wide-toothed comb or a brush with soft bristles to detangle your hair when it’s wet. Wet hair is more prone to breakage, so be patient and gentle to avoid causing unnecessary damage. Begin brushing from the ends and work your way up to the roots to prevent tugging on knots and causing breakage.

    Avoid brushing your hair roughly or vigorously, as this can lead to hair breakage and split ends. Instead, use a gentle hand and smooth strokes to work through any tangles. Additionally, consider brushing your hair less frequently to reduce the stress on your hair strands.

    Remember to always be mindful of the condition of your hair and adjust your brushing technique accordingly. By incorporating these gentle hair brushing techniques into your routine, you can help maintain the health and integrity of your hair while keeping it looking its best.

    Embracing Natural Hair Styling Methods

    Embrace natural hair styling methods to enhance your hair’s health and beauty. Opting for natural styling techniques can help maintain your hair’s natural texture and prevent damage caused by heat and chemicals. Embracing your hair’s natural state not only promotes its overall health but also allows you to flaunt your unique hair characteristics.

    When styling your hair naturally, consider air-drying instead of using heat styling tools like blow dryers or straighteners. This simple switch can significantly reduce heat-related damage and help your hair retain moisture. Additionally, try embracing your natural hair texture by using styling methods that work with your hair’s natural pattern, such as twist-outs or braid-outs for curly hair.

    Natural hair styling methods also include protective styles like braids, twists, and buns, which help shield your hair from environmental stressors and manipulation damage. By incorporating these techniques into your styling routine, you can maintain healthy, beautiful hair while minimizing the risk of damage.

    Choosing Hair-Friendly Styling Products

    Consider selecting hair-friendly styling products that prioritize nourishing ingredients to maintain your hair’s health and vitality. Look for products that are free of sulfates, parabens, and alcohol, as these can strip your hair of its natural oils and cause dryness and damage. Opt for products enriched with natural oils like argan, coconut, or jojoba oil, which can help nourish and hydrate your hair while providing a protective barrier against heat styling. Additionally, choose styling products that contain vitamins and antioxidants to promote hair strength and resilience.

    When selecting products, pay attention to labels that indicate they’re specifically formulated for your hair type, whether it’s curly, straight, fine, or thick. Using the right products tailored to your hair’s unique needs can help enhance its natural beauty without compromising its health. Remember to read reviews and seek recommendations from hairstylists or friends with similar hair types to find products that have worked well for others. By making informed choices and prioritizing nourishing ingredients, you can style your hair effectively while keeping it healthy and damage-free.

    Beauty & Personal care
    [product_category category=”beauty-personal-care” per_page=”10″ columns=”2″ orderby=”date” order=”rnde”]

  • What Every Gamer Should Know

    What Every Gamer Should Know

    You’ve probably heard conflicting opinions about overclocking and its impact on gaming performance. Before you dismiss it as too risky or unnecessary, there are crucial myths and facts you should be aware of. Understanding the truth behind overclocking can potentially unlock hidden power in your system, but it’s essential to separate fact from fiction to make informed decisions. So, what are the real implications of overclocking on your gaming experience? Let’s explore together.

    Common Overclocking Myths

    If you think overclocking always leads to fried hardware, you might be falling for a common misconception. Overclocking, when done responsibly and within safe limits, doesn’t necessarily result in damaged components. It’s true that pushing your hardware beyond its factory settings can potentially increase the risk of overheating and premature wear, but with proper monitoring and cooling solutions, you can mitigate these risks effectively.

    Another common myth is that overclocking voids warranties. While it’s essential to check the warranty terms of your specific hardware, many manufacturers actually allow overclocking to some extent without voiding the warranty. As long as you stay within the recommended limits and don’t cause deliberate damage, you may still be covered.

    Some believe that overclocking is only for hardcore enthusiasts with advanced technical skills. However, with user-friendly software and guides available, even beginners can safely explore overclocking to boost their system performance. It’s essential to educate yourself, proceed cautiously, and enjoy the performance benefits without succumbing to these myths.

    Benefits of Overclocking

    Discover the performance enhancements that come with overclocking your hardware. By pushing your CPU or GPU beyond its factory-set limits, you can experience improved speed and overall better performance in your games. Overclocking allows you to squeeze out extra power from your components, giving you a competitive edge in demanding titles that require high frame rates.

    One of the key benefits of overclocking is the increased processing power it provides. This results in faster loading times, smoother gameplay, and better responsiveness in games. You’ll notice a significant difference in performance, especially when running resource-intensive applications or playing graphically demanding games.

    Moreover, overclocking can extend the lifespan of your hardware by optimizing its capabilities. While it’s crucial to be cautious and not push your components too far, when done correctly, overclocking can enhance your gaming experience without the need for expensive upgrades. Overall, the benefits of overclocking lie in maximizing the potential of your hardware and achieving a more enjoyable gaming experience.

    Risks and Limitations

    When considering overclocking, it’s essential to be aware of the potential risks and limitations associated with pushing your hardware beyond its intended specifications. One of the primary risks of overclocking is overheating. By increasing the clock speed of your components, you also increase the heat generated, which can lead to instability and even permanent damage if not properly managed.

    Another risk is reduced hardware lifespan. Overclocking puts additional stress on your CPU, GPU, and other components, which can shorten their lifespan if they’re constantly pushed to their limits. Additionally, overclocking may void your warranty, as most manufacturers don’t cover damage caused by overclocking.

    Furthermore, there are limitations to how far you can overclock your hardware. Not all components are created equal, and some may have lower overclocking potential than others. It’s essential to understand the limitations of your specific hardware to avoid disappointment or damage.

    In the next section, we’ll provide you with tips for safe overclocking to help you mitigate these risks and limitations.

    Tips for Safe Overclocking

    To safely overclock your hardware, it’s crucial to start by carefully researching and understanding your specific components’ capabilities and limitations. Before diving into the overclocking process, make sure your CPU, GPU, RAM, and other hardware are capable of being overclocked. Check online forums, manufacturer websites, and reviews to gather information on safe overclocking ranges for your components.

    Ensure that your system has adequate cooling to handle the increased heat generated during overclocking. Investing in a high-quality cooling solution such as a liquid cooler or a robust air cooling system can help prevent overheating and potential damage to your hardware.

    When overclocking, make small adjustments to settings rather than making large jumps. Incrementally increase clock speeds and voltages while running stability tests to ensure that your system remains stable under the new settings.

    Lastly, always monitor temperatures, voltages, and system stability while overclocking. Use monitoring software to keep an eye on these metrics and be prepared to dial back your overclock if you encounter any issues. By following these tips, you can safely push your hardware to achieve better performance without risking damage.

    Gaming

    [product_category category=”gaming” per_page=”10″ columns=”2″ orderby=”date” order=”rnde”]

  • What Are the Best Tips for Designing a Family-Friendly Garden?

    What Are the Best Tips for Designing a Family-Friendly Garden?

    When designing a family-friendly garden, you want to ensure it caters to everyone’s needs. From child-safe plants to engaging play areas, there are various elements to consider. But what about those little touches that truly make a garden a haven for families to enjoy together? Stay tuned to discover some often overlooked yet incredibly impactful tips that can transform your outdoor space into a sanctuary for both relaxation and play.

    Selecting Child-Safe Plants

    When choosing plants for your family-friendly garden, ensure they’re safe for children to be around. Opt for non-toxic plants to prevent any harm if accidentally ingested.

    Some great options include marigolds, sunflowers, and pansies, which not only add beauty to your garden but are also safe choices for little ones.

    Be cautious with plants like daffodils, azaleas, and oleander, as they can be toxic if consumed. Research plants beforehand to ensure they’re child-friendly and won’t cause any allergic reactions.

    Additionally, consider the texture of the plants to avoid anything prickly or thorny that could potentially harm curious children. Teaching kids about the different plants in your garden and which ones are safe to touch can also be a fun educational activity.

    Designing Play Areas

    To create engaging play areas in your family-friendly garden, consider incorporating elements that cater to children’s imaginations and physical activities. One fun idea is to include a sandbox where kids can dig, build, and let their creativity run wild. You could also add a playhouse or treehouse for imaginative play. Climbing structures like a small rock wall or rope ladder can provide physical challenges while promoting exercise and coordination.

    A designated sports area with a mini basketball hoop or soccer net can encourage active play and friendly competition.

    Another great addition to your play areas is a water feature, such as a small splash pad or a shallow pond (with safety measures in place), where children can cool off and have fun during hot days. Don’t forget to include seating areas for parents to relax and supervise their little ones.

    Incorporating Safety Features

    Consider implementing safety features in your family-friendly garden to ensure a secure environment for children to play and explore. Start by installing soft landing surfaces like rubber mulch or pea gravel under play equipment to cushion falls. Make sure all pathways are well-lit to prevent trips and falls, especially in the evening. Secure any ponds or water features with fences or mesh covers to prevent accidental drowning.

    Additionally, check all plants in your garden for toxicity levels, especially if you have young children who may be tempted to taste them. Remove any poisonous plants and replace them with child-friendly alternatives. Secure any garden tools and chemicals in locked storage to prevent access by curious little hands.

    Consider adding boundaries like fences or hedges to keep children within sight while playing. Finally, inspect play equipment regularly for any signs of wear or damage and repair them promptly. By incorporating these safety features, you can create a family-friendly garden that provides a safe space for children to enjoy nature and play freely.

    Creating Spaces for Family Bonding

    Creating spaces in your garden that foster family bonding is essential for strengthening relationships and creating lasting memories. One way to achieve this is by incorporating a cozy seating area where family members can gather for conversations or enjoying meals together. A simple picnic table or a set of comfortable chairs arranged around a fire pit can provide the perfect setting for quality time spent with loved ones.

    Another idea is to create a designated play area for children, complete with fun and engaging activities like a sandbox, swing set, or a mini obstacle course. This won’t only keep the kids entertained but also encourage them to spend more time outdoors, away from screens and gadgets.

    Additionally, consider adding a vegetable or flower garden that the whole family can tend to together. Gardening is a great way to teach children about responsibility and the beauty of watching something grow and flourish over time.

    Garden

    [product_category category=”garden” per_page=”10″ columns=”2″ orderby=”date” order=”rnde”]

  • A Beginner’s Guide to Proper Car Washing Techniques

    A Beginner’s Guide to Proper Car Washing Techniques

    When it comes to washing your car, taking the time to do it correctly can make a significant difference in the overall look and condition of your vehicle. By understanding the proper techniques and using the right tools, you can ensure a thorough clean that protects your car’s paint and finish. Starting with the basics and gradually mastering the process will not only enhance your car’s appearance but also contribute to its longevity.

    Importance of Proper Car Washing

    Proper car washing ensures your vehicle maintains its shine and protects its paint from damage. Washing your car regularly helps to remove dirt, grime, and other contaminants that can accumulate on the surface. These contaminants, if left unchecked, can lead to scratches, swirl marks, and even corrosion on the paintwork.

    In addition to preserving the appearance of your vehicle, regular washing also helps to maintain its resale value. A clean and well-maintained car is more attractive to potential buyers and can fetch a higher price when it comes time to sell.

    Moreover, washing your car yourself allows you to inspect its condition up close. You can spot any chips, dings, or other imperfections that may require attention. This proactive approach can help you address minor issues before they escalate into costly repairs.

    Essential Tools and Supplies

    To effectively wash your car, you’ll need a set of essential tools and supplies that ensure a thorough cleaning process. The first item on your list should be a gentle car wash soap specifically formulated for automotive use. Avoid using household detergents as they can strip off wax and harm the paint.

    Additionally, invest in a quality microfiber wash mitt or sponge to prevent scratching the surface of your car while washing. A couple of buckets are essential – one for the soapy water and another for rinsing your mitt to keep dirt away from the clean water.

    To dry your car efficiently and prevent water spots, a microfiber drying towel is a must-have. You may also consider using a separate towel for drying wheels to avoid transferring brake dust to the body. A good quality wax or sealant will help protect your car’s paint and keep it looking shiny.

    Step-by-Step Car Washing Technique

    Start by rinsing your car thoroughly with clean water to remove loose dirt and debris before moving on to the washing process. Use a hose with a gentle spray or a pressure washer on low setting to ensure all the dirt is loosened and washed away.

    Next, prepare a bucket of soapy water using a dedicated car wash soap. Dip a clean wash mitt or microfiber cloth into the soapy water and start washing your car from the top down, working in sections to prevent soap from drying on the surface. Rinse the wash mitt frequently to avoid scratching the paint with dirt particles. Once the entire car is washed, rinse off all the soap thoroughly with clean water.

    After rinsing, dry the car using a soft microfiber towel or a drying cloth to prevent water spots. Start by blotting the water rather than rubbing to avoid swirl marks. Pay special attention to drying seams, crevices, and other hard-to-reach areas. Your car is now clean and ready for the next steps in car care.

    Tips for Maintaining a Clean Car

    Consider implementing a regular car washing schedule to keep your vehicle looking its best and protect its paint from dirt and contaminants. Washing your car once a week is ideal, but aim for at least every two weeks if you can’t manage weekly washes. Additionally, don’t overlook the importance of drying your car after washing to prevent water spots and streaks. Use a clean microfiber towel or chamois for best results.

    Regularly vacuuming the interior of your car helps maintain cleanliness and prevents dirt and debris from building up. Pay special attention to areas where crumbs and dirt tend to accumulate, like under the seats and in between crevices. Wipe down surfaces with a damp microfiber cloth to keep dust at bay.

    Lastly, consider applying a coat of wax every 3-4 months to protect your car’s paint and give it a shiny finish. This extra layer acts as a barrier against environmental contaminants and UV rays. By following these tips, you can ensure your car stays clean and in top condition for years to come.

    Automotive & Tools

    [product_category category=”automotive-tools” per_page=”10″ columns=”2″ orderby=”date” order=”rnde”]